Sunday, January 10, 2016

Floral Frenzy.

Hello!

Happy new year everyone! It feels incredible to start off another year. I feel refreshed, adventurous, and ready to embrace new experiences. I hope you're all off to a great start too!

Yesterday, I spent a delightful girls day out with my sister and baby niece. We have been planning this day for a while, so our anticipation was running high. Overall, our plan was to head to Downtown L.A. to gather fresh materials to create our flower crowns. We woke up early to enjoy breakfast, and then headed straight to the Los Angeles Flower District


The L.A. Flower Market was a large facility with a mellow ambiance. Everybody was very nice, and there was an abundance of flowers and foliage to choose from. We left with five bundles of fragrant and fresh finds ranging from round Eucalyptus leaves to a bundle of fuchsia roses.

Aren't these roses absolutely gorgeous?


After lunch and a few more errands, we headed back to my sister's place where the DIY magic was about to begin.


With the sun beginning to set and no real game plan for these flower crowns, we decided to improvise each step of the process. 

Materials
  • Craft Wire
  • Gardening Sheers
  • Scissors
  • Floral Tape
  • Flowers
  • Foliage
  • Optional: Gardening Gloves (if you want to)

Steps:

  1. First, my sister and I each selected what color scheme we wanted for each of our crowns.
  2. We then picked out the flowers and foliage that we wanted to use, and began to play around with different bunches and clusters to finalize our pattern plans.
  3. Next, we measured the circumference of our heads, and then used the measurement to cut out our craft wire to the nearest inch, making sure to leave a little extra wire to twist the ends together. 
    • Note: We ended up using double the amount of wire to further stabilize the shape of the crown, because our craft wire was too thin. Make sure you find a solid, but flexible craft wire to avoid having to double your measurements.
  4. Then, we taped the ends of the overlapping wires to hold them in place. Taping the wire ends also prevents scalp chafing.
  5. After we finished the skeleton of our crowns, we applied foliage to the wire. We trimmed the leaves and branches to about three to four inches long, making sure to leave at least about one to two inches of clear space at the bottom of the foliage to attach the foliage to the wire with floral tape. 
    • We taped the foliage from the top of the stem to the bottom, and repeated this process all the way around the crown.
  6. We continued this process until we created the desired fullness of our crown base. 
  7. Then, we trimmed our flowers, and taped them to the craft wire (starting from the base of the flower, down to the bottom of the stem).
  8. After about 20-30 minutes, we were done! Overall, we made two adult crowns, and one infant crown, while still having plenty of flowers and foliage to spare.
Overall, we were both satisfied with our results. The crowns were durable, yet surprisingly lightweight. Here are the results of two out of the three crowns we made:

Baby J's Flower Crown

Close-Up of Baby J's Floral Crown

My Flower Crown

Close-Up of My Flower Crown

Final Product: What do you think?

Even today, the crowns continue to be fragrant and to hold their shape. All in all, this was a fun project, and I would definitely do it again. I look forward to sharing more great Do-It-Yourself (DIY) projects with you all in the future, and I hope that you will try this out at home! If you do, be sure to tag me on Instagram or Twitter via @Tran_gerine so that I can take a look at your creations! Also, be sure to leave me a comment down below if you have any questions or need some clarifications about the steps that I have provided above. Until next time, happy styling!

xo 

Melissa


Sunday, December 13, 2015

City Life.

Nothing beats the holiday blues quite like an adventure. With the craziness of fourth quarter and the holidays rapidly approaching, I was getting too overwhelmed. 

Luckily, I was able to escape to L.A. this weekend. I purposely left my phone at the bottom of my bag to allow myself to fully enjoy the sights and sounds of the city. With my SLR by my side, I was able to capture some great city shots without the distraction of email and social media notifications. Check out the gorgeous shade of red on this building that I came across over the weekend:


Overall, the highlight of my weekend was visiting the Art District in DTLA. The pedestrian traffic was relatively light, making it easier to enjoy the beauty of the city. I loved checking out the various murals, and stopping by a local boutique for some cool finds.


Moreover, the weather was gorgeous all weekend. I loved being able to roam the city freely without freezing to death. Definitely a perk of living in Southern California.

Floral Midi Dress: Zara; Brown Tote: Urban Outfitters

Black Hat: Target; Sunglasses: Komono

Shoes: Restricted Shoes

Let's talk about the amazing food in L.A.! I loved eating at Wurstküche. As a first timer, I came in with a clear mind and an empty stomach. When we arrived, everyone was extremely hospitable, and genuinely interested in making us feel comfortable and welcome. In addition, the beer and food was amazing. The Mango Jalepeño brat was phenomenal, and easily takes the top spot for best thing I ate this weekend.


But alas, who could forget about the French Fries? They were lightly salted and thickly cut. Furthermore, they were crispy on the outside and fluffy on the inside. Hands down the best French Fries I've had in a while. Did I mention the fries also came with Chipotle Ketchup? Because it did, and it was AWESOME.


Well, it looks like that's a wrap from this weekend's festivities. If any of you have any suggestions of where I should venture to next, I'd love to hear all about it! Until next time, happy styling (and eating)! 

xo

Melissa


Sunday, October 11, 2015

Makeup Madness.

Hello!

As promised, I'm back to give you a few of my favorite makeup tutorials and tips for Halloween. Whether you're planning on going out, or having a mellow Halloween at home, it's always fun to dress up for the occasion.

Before I start, I thought I would introduce you to a few of my makeup staples. While this is not cumulative display of my collection, it does cover the products and tools that I consistently use in my Halloween makeup looks.


Pictured:

+ Target White Face Paint Tube


Also, I thought that I would also take this opportunity to share some of my favorite drugstore lipsticks for fall and Halloween. By the way, they are only $1.99 at CVS! Secret's out.

Starting from left to right:

Now onto the tutorials! *Note*: I am by no means a makeup artist. I simply enjoy Halloween makeup, and would like to share my experience with others. Without further ado, let's begin!

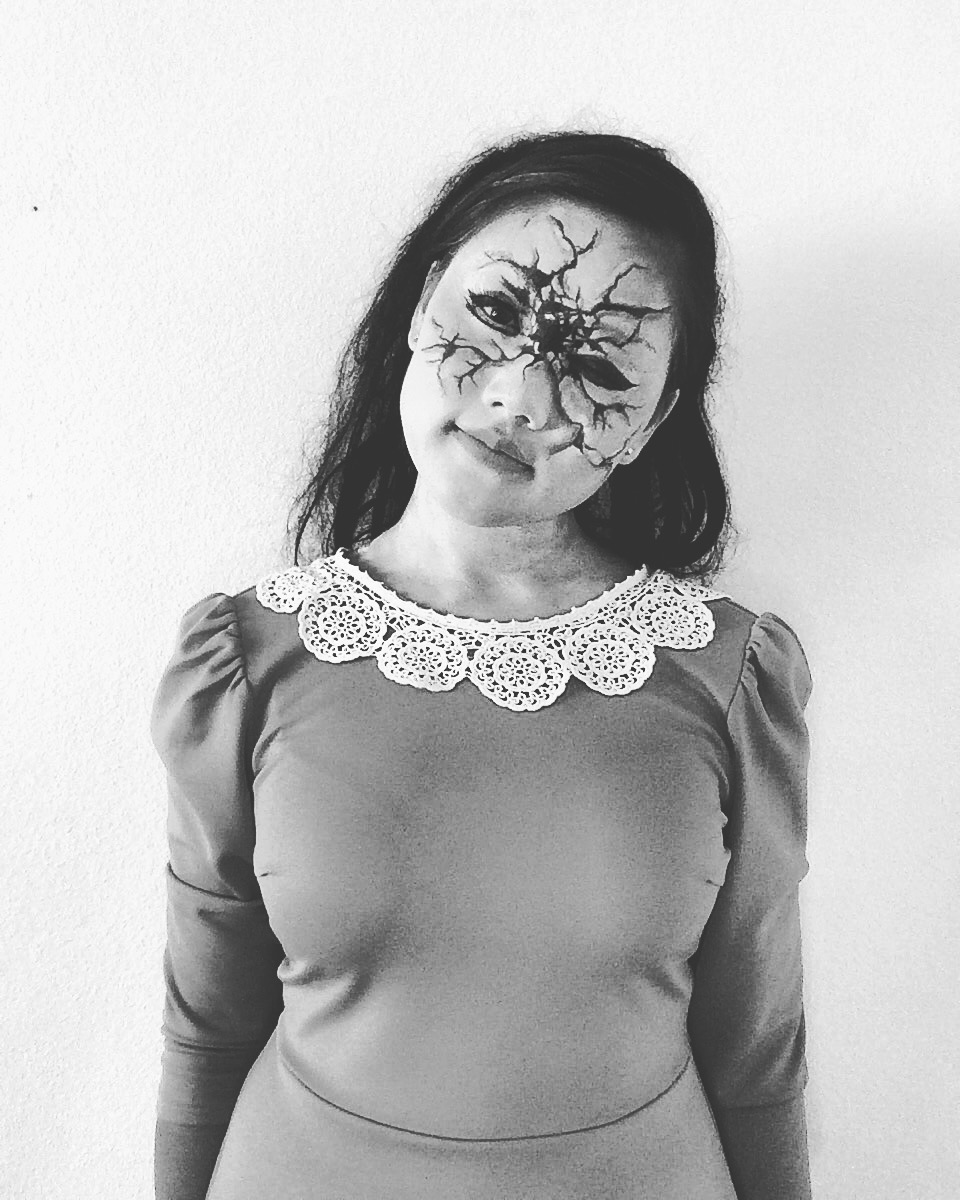
BROKEN DOLL:

I gained inspiration from this look from both Lex of Madeyewlook and Alison of AlisonlovesJB. I pretty much mixed their tutorials together to get my desired look. 

  1. Clean your face and moisturize.
  2. Apply concealer and eye primer.
  3. Apply a foundation several shades lighter than your natural complexion, or apply a light coat of white face paint to your face and neck. You want to make your face pale resemble the complexion of a porcelain doll by making your skin look as smooth and even as possible. If you decide to go with face paint like I did, there is a great $1 face paint from Target that you can use. Apply the product with a disposable foundation applicator using a dabbing motion throughout your face and neck. Do not use a brush, as it will leave streak marks on your face. Please be aware that because this product is intended for leisurely use. As a result, you may need to allow time between face paint applications to let the product dry before continuing to build up to your desired color.
  4. Set your face with a face powder. This is very important, because you do not want your foundation or face paint to budge.
  5. Apply your favorite rosy blush to the apples of your cheeks.
  6. Use a black gel liner and a thin eyeliner brush to create a cat eye on one of your eyelids.
  7. Close your other eyelid, and feel the shape of your eye. Find the crease, and then apply gel liner all over the closed eyelid. This will be your "missing eye". Don't forget to set it with a black eyeshadow!
  8. Now find an area of your face where you would like to start the cracks. I chose the area between my eyes. Use your gel liner to draw lines across your face, and fill in any intersecting lines to illustrate pieces of your porcelain face that might have "fallen out". 
  9. Once you are done creating your lines and filling in different areas of your face with gel liner, go back with a white liner and trace the sides of some of the black lines that you have already created. This will create a raised look to your skin.
  10. When you are done with this step, you can go back with some gray eyeshadow and shade in the other side of the black eyeliner lines to add more dimension to your cracks.
  11. Now apply your favorite pink lipstick or lipgloss, and you are all done!

FLAPPER/MIME:


I gained inspiration for this look from YouTuber, Emma Pickles. In her video, she attempts to recreate a runway look by the famed, Pat McGrath. You can follow her tutorial here.

If it helps to refer to a written tutorial:
  1. Follow steps 1-5 of my broken doll tutorial.
  2. Use a concealer or extra white face paint to conceal your eyebrows. Set it with a face powder.
  3. Use a liquid liner pen (I used Maybelline) to draw in your thin, 1920s inspired eyebrows. They don't have to be perfect. That's the fun part about it!
  4. Fill your eyelids and below your eyelids with purple eyeshadow, and blend them out to create a watercolor effect.
  5. Fill in your crease with a dark purple eyeshadow or black eyeshadow. Then blend it out.
  6. Line your top and bottom waterline with black eyeliner.
  7. Grab a clean eyeshadow brush, and spray a little bit of water onto it. Then pull the black eyeliner color from your bottom lid down with short brush strokes to create a runny effect.
  8. Line your lips and then fill them in thinly with a dark, maroon lipstick. I used "Cherry Bomb" from Wet 'n' Wild.
MORTICIA ADDAMS:

I've been wanting to recreate this look ever since I did the Wednesday Addams look last Halloween. I used a lot of photos from the internet as a reference.


  1. Follow steps 1-5 of my broken doll tutorial.
  2. Use a dark eyebrow pencil or black gel liner to create thin, arched eyebrows.
  3. Apply white eyeshadow to your eyelids.
  4. Find your crease, and fill it in with black eyeshadow. Blend it out (and up) for a softer look.
  5. Place a piece of paper or a business card flat on the side of your eye (move it to about a 45 degree angle from the edge of your eyelid) and blend out the black eyeshadow from your crease to create a smoky cat eye effect.
  6. Use a gel liner to line your eyelid. Aim for a cat eye.
  7. Use a black eyeliner to line your bottom waterline, making sure to use a smudge brush to soften the line. 
  8. Use a contouring brush and gray eyeshadow to contour your nose, cheeks, temples, and chin.
  9. Line your lips with a red lipliner, and apply your favorite shade of red lipstick.
  10. All done!

CRUELLA DE VIL:

Ok Disney fans, this one is for you. Here is my twist on the famed puppy snatcher.


If you have been following along with the previous tutorials, this one's a cinch. 

MAKEUP:
  1. Follow steps 1-5 of my broken doll tutorial above.
  2. Apply white eyeshadow to your eyelids.
  3. Above your eyelid crease, apply copper/brown eyeshadow. 
  4. Apply dark brown or black eyeshadow on your crease and blend it into the copper/brown eyeshadow.
  5. Use a dark eyebrow pencil to create high arched eyebrows. Use a spooley to blend the color into your eyebrows.
  6. Tight line your upper eyelids with a black eyeliner.
  7. Next, tight line your lower eyelids with a white eyeliner to make your eyes appear bigger. Then line the area underneath that with a black eyeliner. Don't forget to smudge out the black line to soften it up. 
  8. Apply mascara to your eyelashes and/or falsies.
  9. Use bronzer to contour your nose, cheeks, and chin.
  10. Apply your favorite shade of lipstick. I used "Cherry Bomb" from Wet 'n' Wild.
HAIR:
  1. Curl your hair. Overnight, curlers, curling iron...whatever you like. Let the curls cool down before proceeding to the next step. This is very important! Do not skip it, or your curls WILL fall!
  2. Backcomb and tease your roots and curls with a teasing brush.
  3. Apply hairspray.
  4. Use a white temporary spray dye on half of your hair. If you don't have the spray, use a fine-toothed comb and the $1 white face paint from Target to create your white hair. Squeeze some product into your hands, and then distribute the product with the comb. Don't worry, the product will wash away with water in the shower. I already tried it for you.
There you have it! A few of my favorite Halloween looks and tutorials for this year. If you have any questions, please feel free to leave a comment below, or tweet me via @mtranstyle. You can also follow my day-to-day activities on Instagram via @Tran_gerine. Until next time, Happy Halloween and happy styling!

xo

Melissa


Saturday, September 26, 2015

Bridging the Gap.

Hello!

It feels great to be back after a long hiatus. A lot has happened in the past two months. From switching jobs, to traveling, to trying to catch up on life, I decided to take some time off from the blogging world to focus on myself. 

As I return to blogging, I've come to realize how much happier I am these days. Having more consistency and creative liberties in my life lately has had a positive effect on my life. My head is spinning less, which is always a good thing.

So what have I been up to lately? Aside from work, I've been exploring fashion trends, getting back into the routine of working out, and looking at more places to travel. I've got a huge case of wanderlust.

This week, I took a mini vacation to San Francisco, where I caught up with some close friends. It was a wonderful trip filled with great company, exquisite views, and lots of good eats. Have a look for yourself!

DAY ONE

Drove past the women's center, where there was incredible art covering the building.

First stop: Craftsman & Wolves for breakfast!
The Rebel Within Muffin. So gooey, so good!

Dessert for breakfast. A pear tart with cacao nibs. Really yummy!

Second Stop: Philz Mint Mojito Iced coffee.

Next up: Mr. Holmes Bakehouse! An SF staple.

The Lemon Custard Donuts were to die for! Absolute best.

Top view of the city. Twin Peaks for the win!

The Painted Ladies have come a long way since Full House...that lawn though.

Got to play explorer for the day at the California Academy of the Sciences.

Rooftop drinks overlooking the city with some girlfriends, before getting dinner with the whole crew.

DAY TWO

Woke up early to grab breakfast and walk to Fisherman's Wharf.
Got to catch a glimpse of Alcatraz and some early morning ferries.

Walked over to Ghirardelli Square to do some exploring.

SF has got some crazy slopes. This, however, was not one of them.

Pier 39 gets my seal of approval.

Morning exercise.

This initially seemed like a poor outfit choice. However, everything surprisingly stayed in place despite high winds. THANK GOODNESS. (Trench: Zara; Dress: Abercrombie & Fitch)

Sriracha Oyster Appetizer at Hog Island Oyster Co.

Lunch is served! Clam Chowder from Hog Island Oyster Co. Can't be beat.

Dessert time! Got the Special Breakfast (aka Bourbon & Corn Flakes) and Blue Bottle Vietnamese Coffee Ice Cream from Humphry Slocombe Ice Cream.

Fun architecture across the street from the Ferry Building.

Mezzanine view of the Ferry Building before heading to Union Square.

I honestly cannot believe that I got so much done in two days. It's still difficult for me to wrap my head around the fact that I did more in two days in San Francisco this week than I did in 3.33 years when I lived in Northern California. Thank you to Carmen, Tonhu, Tiffany, Thu, Suveena, and Roy for taking the time out of your busy schedules to come see me in the city. It was so great to catch up!

I can't wait for October. Get ready for some more style posts and Halloween shenanigans. It feels good to be back. Let me know if there's anything in particular that you want me to style or test out. You can leave me a comment below, or connect with me on Twitter via @mtranstyle. If you are curious to see what I'm up to on a daily basis, you can find me on Instagram @Tran_gerine. 

Until next time, happy styling!

xo

Melissa


Friday, July 17, 2015

Groovy Baby!

Happy Friday!

Can you believe it? We're halfway through summer! It's so crazy how quickly time flies! I hope that all of you have had the opportunity to go outside and enjoy this warm weather. Lately, Southern California has had a mild summer with a couple of scattered heat waves and thunder storms. Personally, I have taken I liking to it.

Today, I thought I would share with you one of my favorite outfits for summer. This retro inspired look is perfect to wear to a BBQ, a casual date, or a girls day out.


Outfit:
I found this lovely  1960's Style Polka Dot Romper from Unique Vintage about two weeks ago. Let me tell you, it was definitely love at first sight! I really like the convertible boatneck/off-the-shoulder design and the loose sleeves. Furthermore, the navy blue and white pattern add a nice classic touch. My favorite part of the romper is the camel toned belt. It's not too often that retailers include the belt with the romper, but it was a perfect accessory to highlight my natural waistline. The romper also comes in yellow if you're interested!


The best part of this romper is how comfortable and cool it was. I had no issues with garment readjustments or overheating whatsoever. It's the perfect piece of clothing for those of you who want a low maintenance outfit for summer. Consider it a 2-for-1 special if you would!


Hair & Makeup
I opted for a 60's inspired look, with a contemporary twist. Honestly, I think that I lucked out with my bob hairstyle. It's low maintenance, and it dries quickly. I didn't have to style it or put any product in it. I just brushed it and let it air dry.

For my makeup, I went with a classic, sun-kissed look. I really focused on highlighting my eyes and my cheeks. For my eyes, I went with a simple cat eye followed by a generous coat of mascara to really bring out my upper lashes. For my bottom lashes, I created faux lashes with an eyebrow pencil to create that signature mod eye look. Moreover, I contoured the hollow of my cheeks to highlight my cheekbone structure, and applied a rosy tint of lipstick to my lips to add a splash of color.

Interested in recreating this makeup look? I've detailed the products below!

What you'll need:
Moss Green Fedora - vacation (don't remember store name)

Shoes:
I found these adorable tan Doreen heels from Restricted Shoes about one to two weeks ago. Their 70's retro vibe really drew me into them. As a huge devotee to flats, this was a tough choice for me. While I love the aesthetic of heels, I am the biggest offender when it comes to getting cuts and blisters on my feet (despite taking all of the necessary precautions). Amid this mental debate, I actually decided to take my chance on these heels because of my past experiences with Restricted Shoes.

Let me explain....

To start off, I own about six pairs of Restricted Shoes. If you have been following me on Instagram for a while, you will notice that I tend to wear the same shoes over and over. I've been wearing their shoes for over a year now since first discovering them on Modcloth. Since then, I've put a lot of mileage on these shoes, due to their affordability, comfort, and style. Since purchasing their shoes, I've never had a foot injury or fashion dilemma. True fact!

Wanna see more? Check out my Instagram!

The history that I have with their shoes made it a lot easier for me to take a chance on these Doreen heels. I'm really glad that I did! The heel is thick enough to walk comfortably for a novice heel trekker like me, yet tall enough to give me just the right amount of height (my estimate is about 2-2.5 inches). I spent two hours of my day last week walking around in them, and had no issues breaking them in.


If you're interested in checking out these Doreen heels or would like to explore other Restricted Shoes, I would highly recommend it! As an added bonus, if you use the coupon code TRANGERINE25 on their website, they will give you 25% off your purchase of any regular priced item, valid now through August 31st. How cool is that? As an avid online shopper, I haven't found a discount quite that high in the last couple of months. Go check them out!

I hope you enjoyed this look, and will be inspired to add some flair to your summer style. If you do decide to rock a romper this summer or get a pair of Restricted Shoes, don't forget to tag me on Twitter or Instagram via @Tran_gerine so that I can check out your style! Until next time, happy styling!

xo

Melissa